NanoPi NEO Air

위키 : 링크

eMMC에 운영체제 탑재시키기
기본 리눅스 운영체제가 설치되어 있지만, 기기를 원활히 동작시키기 위해서는 추천하는 리눅스 운영체제를 설치하여야 한다. 위키에 관련 내용이 있으며, 간략히 설명하면 다음과 같다.
- Win32diskimager을 이용하여 다운로드받은 linux image를 sd카드에 탑재시킨다.
– OS 이미지는 이 링크에서 다운로드 할 수 있다.
–
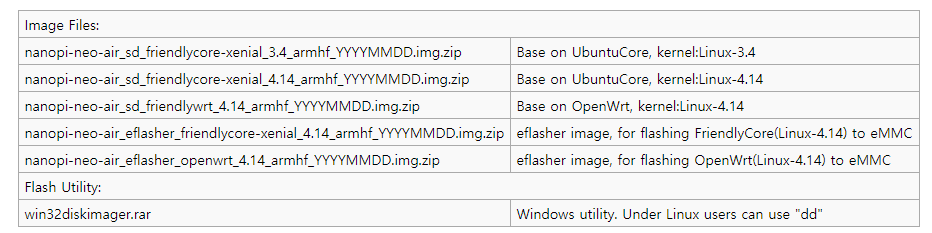
- official-ROM 폴더의 nanopi-neo-air_eflasher_friendlycore-xenial_4.14_armhf_20191230.img.zip 을 다운로드함
2. 이미지가 기록된 sd 카드를 본체에 삽입한다.
3.usb to UART 커넥터를 이용하여 pc와 연결한다.
4.PC에서 putty를 이용하여 serial 연결을 시도한다. 이 때에 baudrate는 115200으로 설정한다.
5.다음 명령에 따라 새로운 리눅스를 설치한다.
- For more details about eflasher refer to the wiki link: EFlasher。
- Extract the eflasher Image and win32diskimager.rar files. Insert a TF card(at least 4G) into a Windows PC and run the win32diskimager utility as administrator. On the utility’s main window select your TF card’s drive, the wanted image file and click on “write” to start flashing the TF card.
- Insert this card into your board’s BOOT slot and power on (with a 5V/2A power source). If the green LED is on and the blue LED is blinking this indicates your board has successfully booted.
- If your board doesn’t support HDMI or no monitor is connected you can select an OS by running the following command:
$ su root
$ eflasher
The password for “root” is “fa”.
We take “nanopi-neo-air_eflasher_friendlycore-xenial_4.14_armhf_YYYYMMDD.img” as an example. After you run the “eflasher” command you will see the following messages:

Type “1”, select writing friendlycore system to eMMC you will see the following messages:

Type “yes” to start installation:

After it is done power off the system, take off the TF card, power on again your system will be booted from eMMC.
로그인 시 웰컴메시지 수정
/etc/update-motd.d/10-header 파일을 수정
0개의 댓글